

In this article, we will learn How to host WordPress Multi-Site on Google Cloud Compute Engine?
- Create a new VM
- Reserve a Static IP
- Map a Custom Domain
- Configure our Primary Domain
- Add a new Web Site with Sub Domain
- Add a new Web Site for another Domain
- Install SSL Certificates
Step 1 - Create a new WordPress MultiSite VM
To create a new VM open Google Cloud Compute Engine VM instance open the marketplace. Filter VMs by "Blog & CMS" and then "Free". After the filter, we have the following options for the WordPress VMs
- WordPress Type Kubernetes App
- WordPress Type Virtual Machine
- WordPress 4 on PHP 5 Type Container images
- WordPress 4 on PHP 7 Type Container images
- WordPress 4 Certified by Bitnami Type Virtual Machine
- WordPress Multi-Tier Type Virtual Machine
- WordPress Multisite Type Virtual Machine
- WordPress Multisite Certified by Bitnami Type Virtual Machine
- WordPress on LEMP 7 Max performance Type Virtual Machine
- WordPress with NGINX and SSL Certified by Bitnami Type Virtual Machine
We selected “WordPress Multisite Certified by Bitnami” virtual machine. Next, on the virtual machine overview page, click on the "Launch on Compute Engine" button. Before launching we need to provide the VM location, CPU, RAM and Hard Disk and Firewall Rules. Provide the values for the options as per your requirement. It is important to select the right location, CPU, RAM, Hard Disk and Firewall Rules. For our VM we selected the following options
- Deployment Name: WordPress-multisite-1
- Zone: us-central1-f
- Machine Type: small (1shared vCPU) with 1.75 GB Ram
- Boot Disk: Standard Persistent Disk
- Boot disk size in GB: 10
- Firewall: Allow both HTTP and HTTPS traffic.
Once done, click on the Deploy button to deploy the virtual machine. Virtual Machine will be deployed with the following software.
Operating System Debian (9)
Software:
- Apache (2.4.34)
- ImageMagick (6.9.8)
- Lego (1.0.1)
- MySQL (5.7.23)
- OpenSSL (1.0.2p)
- PHP (7.0.31)
- phpMyAdmin (4.8.3)
- SQLite (3.18.0)
- Varnish (4.1.0)
- WordPress Multisite (4.9.8)
- WP-CLI (2.0.1)
Wait for the VM to be deployed. Once the VM deployed note down the VM IP, WordPress username and password. We can visit our default website using the IP Address.


If you notice on visiting the IP address, the address for your website changes to http://<vm-ip-address>.xip.io/. This is the default configuration for WordPress Multisite Bitnami stacks. Next, we need to assign a primary custom domain for our WordPress MultiSite installation for this we need to first change the DNS records for our domain which we need to use. Also, to use a domain we need to reserve a static IP address. We will first reserve the IP address and then we will update DNS records for our domain.
Step 2 – Reserve a Static IP Address.
Reserve a Static IP address for your VM. To reserve a static IP address, click on “External IP Address” from the left menu under “VPC network”. Select your VM IP and then convert it from Ephemeral to static.

We are using our VM only for the demonstration purpose, so can skip this step. We don’t need to worry about the change in the IP Address. We only use it to map our domain for only one or two days.
Note: After completing the tutorials we will delete our VMs.
Step 3 – Map a Custom Domain
To map a custom domain with our new Google Cloud Compute Engine VM instance, note down the VMs IP Address. Ensure you are using the External IP. Now we have two options. The first one we will add a DNS record of type “A” on our domain provider control panel. Or else we can update the name servers for our domain and create a DNS zone on Google Cloud. Then we will add a DNS record of Type “A”. Let check both the methods.
Method 1: Adding a DNS Record of type “A” on our domain provider
We are using a FreeNom.com free domain for this demonstration. The steps are the same for all domain providers. Off Corse everyone using their own user interface.

Method 2: Adding a DNS Record Type “A” on Google Cloud Compute Engine
It is a lengthy process, but next time when we edit it DNS we can control it from our Google Cloud Compute Engine control panel. We don’t need to log in again and again on our domain provider control panel. Following are the steps.
Create a DNS Zone on Google Cloud Compute Engine
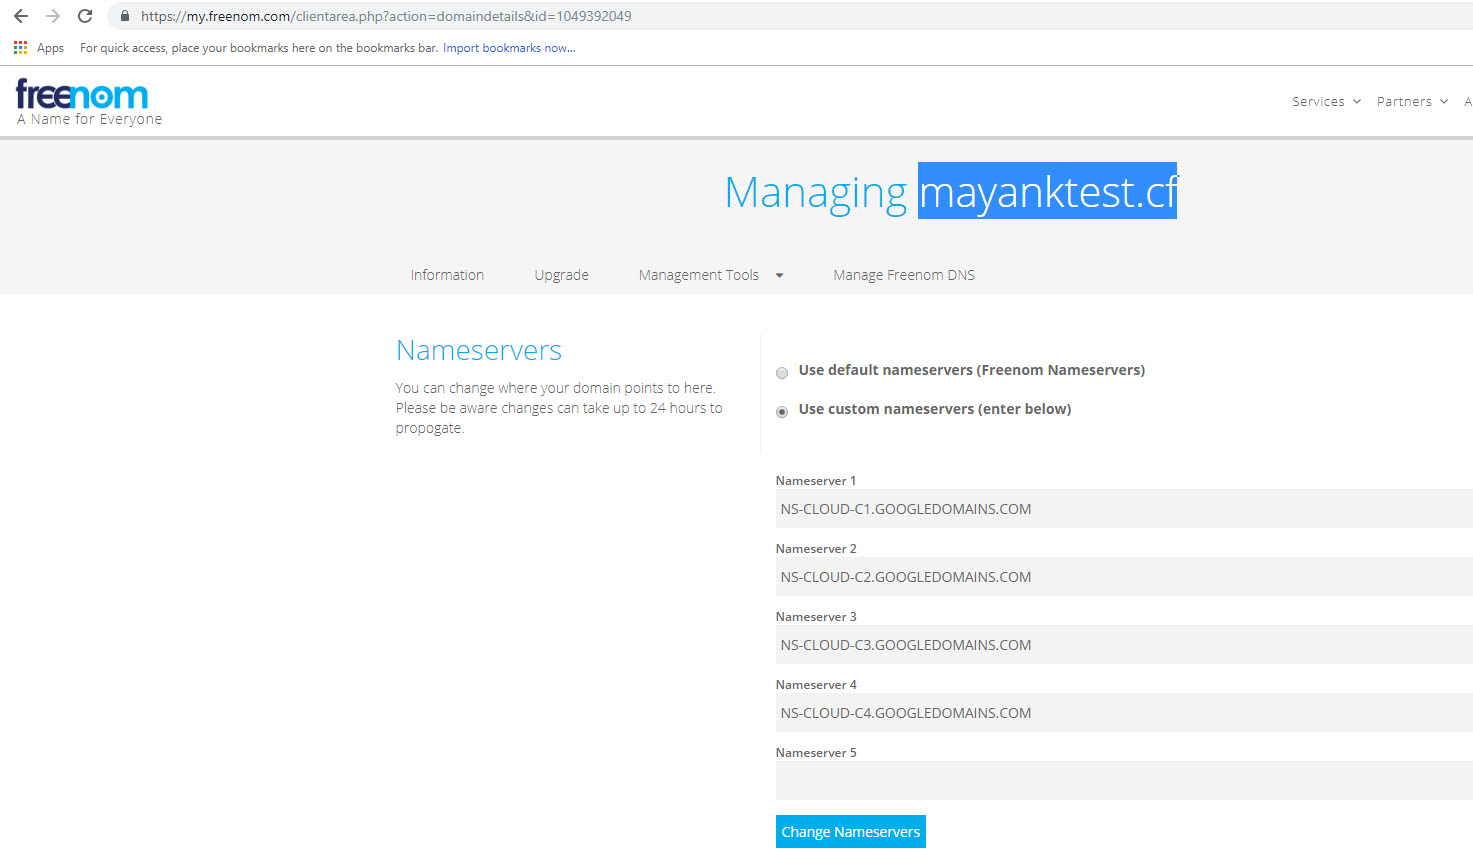
To create a DNS zone, visit open Cloud DNS. Available in the menu under Network Services. If you don’t have any Zone for your domain create one. When you create a new Zone google cloud will provide you the nameserver details, which you need to use. Update all the nameservers on your domain control provider. Check the following image we update the name servers for our testing domain. After updating the nameservers, we can manage our domain at google cloud.
Next, we need to create a new “A” record. The “A” record is used to point our domain with our VM. Create the “A” record with our VM IP. We need to use subdomains, add a wildcard entry to handle all the subdomains. Refer the following image for DNS Zone for our test domain.

Note: We are using the above domain only for the tutorial and demonstration. Please don't use it or provide any information on the same. It is not guaranteed that we will own the same domain next year.
Step 4 Configure our Primary Domain
We reserved a Static IP. Also, we are done with our DNS zone changes. Next, we need to configure our Primary Domain. To configure our primary domain, we need to open the SSH panel. Launch the SSH Panel.
Open “/opt/bitnami/apps/wordpress” directory. You can use the “cd” command to change the directory. Example cd /opt/bitnami/apps/wordpress.
Next, execute the following command to change the Primary Domain Name. We are using mayanktest.cf as our primary testing domain. You need to change the command as per your domain name.
sudo ./bnconfig --machine_hostname mayanktest.cfNote: bnconfig tool runs automatically every time the server starts to reset the machine hostname to its IP address. We don’t want to this. We don’t want to override our changes. To avoid this, we will disable the bnconfig tool for subsequent restarts. Execute the following command to perform the same.
sudo mv bnconfig bnconfig.disabledWe are done with our Primary domain configuration with WordPress VM. Let’s visit our primary domain.

Note: If you are website is not working and if you have a valid DNS record for your domain wait for the DNS changes propagation. DNS change propagation will take up to 24-48 hours.
With our VM we configure mayanktest.cf as a primary domain. We have not created any site yet. If we point another domain with our VM (We are only talking about the DNS changes for the second domain) and we visit our VM with the second domain, the request will be redirected to the registration page.


As shown in the above images if the website is not created for any domain and the subdomain, then the visitor is redirected to the registration page. Registration is disabled yet. Let’s open the WordPress Admin panel and add a new site.
Step 5 Add a new Web Site with Sub Domain
To add a new site with a subdomain, you need to open the WordPress admin panel. If you forgot to note down your WordPress admin account details, follow the below steps
From the menu click on the Deployment Manager. Here you can find all the deployments. Click on the deployment name for your WordPress VM. On the deployment details, you can find the WordPress admin username and password.
Following are the steps to add a new Web Site with a subdomain.
- Open WordPress Admin
- Click on My Sites -> Network Admin -> Sites.
- Click on Add New Button
- Next, you need to provide all the information for your new website.
Once it is done visit the subdomain.


Note: In the Step no 3 at the time of DNS zone entries we added a wildcard entry to handle all the subdomain request.
We are done by adding a new site. Next, we will learn How to add a new website to another domain.
Step 6: Add a new Web Site for another Domain
To use another domain for a new Web Site, we first need to install a plugin. To install the plugin, follow the below steps.
Logged in on Word Press with the Admin User Name and the Password. Use the same which we copied from the Deployment Manager.
- Go to the Plugin Page. Search for plugin “WordPress MU Domain Mapping”. If it is not installed, install it.
- Activate “WordPress MU Domain Mapping”
- Then from the Menu open Domain Mapping available under Settings
- Enable the Permanent Redirect

Next, we need to add our new website for this example we are adding vlemonn.cf domain. Again, to add a new site click on sites and then Add a new Site. This time in the options we will add a new website with the following options
- URL : vlemonncf
- Site Title: vLemonn CF
- Site Language: English
- Admin Email: a@a.com
- Click on Add Site.
Our site is added. Next, we need to find the site id. For this, we will open All Sites Page. Finally, click on the Edit for the newly added site. For us it is vlemonncf, select the correct added site. When you clicked on edit check the URL in the browser. Find them in the URL http://mayanktest.cf/wp-admin/network/site-info.php?id=3 For us it is 3.


Next, if we will visit our new subdomain. When we visited vlemonncf.mayanktest.cf it is not redirecting at vlemonn.cf. For the proper redirection click on Domains available under Settings. On domain mapping page add the following information
- Site ID: 3 (This is ID is for Us)
- Domain: vLemonn.cf
- Primary: Yes
Once done, click on the Save button. After this whenever you will visit on vlemonncf.mayanktest.cf, visitors will be redirected to vlemonn.cf.
Step 7 - Install SSL Certificates
We are almost done with everything. One last thing we need to do is install SSL certificates for Primary and the Secondary domain. We are using WordPress Multisite Bitnami stack. Bitnami comes with a script to install SSL certificates. We will use the same script to install SSL certificates for our Primary and the Secondary domains. Execute the following command to create an SSL Certificate.
sudo /opt/bitnami/letsencrypt/scripts/generate-certificate.sh -m info@mayanksanghvi.com -d mayanktest.cf -d vlemonn.cfDuring the installation, the script will prompt for a few questions. Provide the valid answers to all the questions. Once the script execution is done, it will create a valid certificate for the mentioned domains.
Conclusion
We are done with the Multisite configuration. If you need to need to know any thing else please share your requirement in the comment section. We will try our best to respond ASAP.